If you’re reading this, there’s a good chance that you’re thinking about buying a new drysuit but you’re not sure which drysuit features you actually need.
In this article, I’m going to talk about all the different drysuit features and optional add-ons that are available so a) you know what each is for and b) you can work out if it’s worth your hard-earned cash!
You can jump to each section:
- Neoprene or membrane drysuit
- Feet
- Zips
- Entry methods
- Telescopic suits
- Seals
- Quick fit wrist systems
- Dry gloves
- Quick fit neck systems
- Pockets
- Pee valves
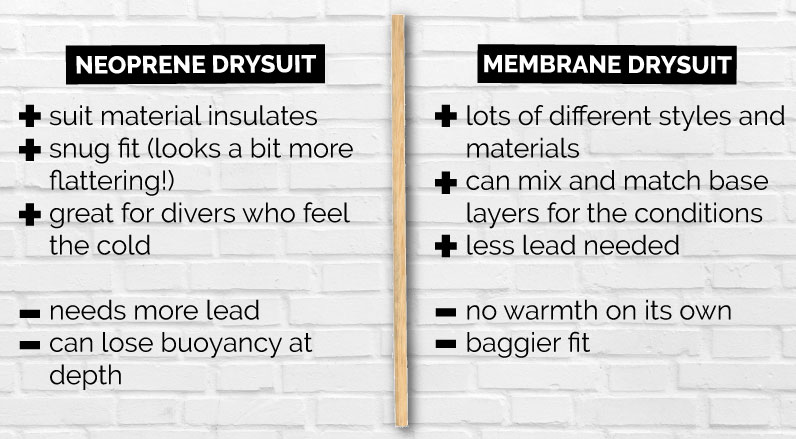
NEOPRENE OR MEMBRANE DRYSUIT
This is probably the first decision you need to make when considering your drysuit features. I wrote a more in-depth blog about it (including an explanation of why we don’t sell neoprene drysuits at The Honest Diver) but here’s a summary of the pros and cons of each.
MY HONEST OPINION
Consider a trilam/membrane drysuit unless you really feel the cold or will be diving in extreme temperatures. For UK diving, you’ll have much more flexibility for diving all year round in a trilam as you can customise your undersuit layers to keep you at the perfect temperature.
I’d love to jump on a video call to help you work out what material will be best for you. We can talk about the type of diving you do and go through which options are suitable.
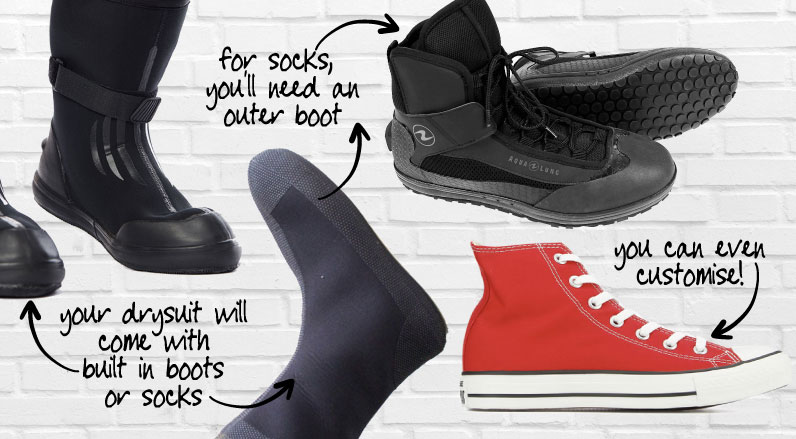
DRYSUIT FEET
You’ve got two options for your feet in a drysuit. You can have boots built into your suit, or you can choose socks and wear separate boots.
When your drysuit features integrated boots, you might find that you’re limited in terms of sizing options for off-the-peg suits. For example, if you’re short but have big feet (or vice-versa) you might struggle to find the perfect suit. If you’re not a “standard” size you might have to go with socks or go down the custom route.
I do like suits that have socks – they can be turned fully inside out for cleaning and repair (sooo much easier compared to boots!) and they’re more flexible when it comes to sizing as one sock fits more divers. The main downside is that those socks are pretty flimsy. Make sure you never walk around barefoot or you’ll end up with more leaks than a colander. You’ll definitely need boots to wear with your socks. Tech boots tend to be more flexible than built-in boots – they allow more flexibility for frog kicking. You could even go down the Converse route!
MY HONEST OPINION
You might find that customising what goes on your feet is limited if you’re buying an off-the-peg drysuit. You’ll just have to accept what your suit comes with, and I certainly wouldn’t choose my drysuit based on my preference for boots or socks – there are far more important drysuit features than that!
DRYSUIT ZIPS
You may have noticed as you’ve been researching drysuit features that there’s two types of zip – brass and plastic.
Brass zips were the mainstay of drysuits for many years. They’re heavy duty and really reliable as long as you keep up with your regular maintenance. Problems can start with metal zips if salt or dirt starts building up, so it needs a bit of cleaning after every dive and some zip lube or beeswax applied to keep it sliding smoothly.
The main thing I don’t like about brass zips is that they can be a bit restrictive when it comes to storage and transport – especially on front entry suits. You really have to pay special attention to how you’re folding your suit so you’re not stressing the zip. You should also make sure you leave the zip open when you’re not using it. Leaving it closed can snap and dislodge the teeth which makes it harder to operate and can cause leaks in the water.
Plastic zips have a bit of a chequered history and a reputation for not being very reliable. Thankfully, all those issues have been resolved as materials and technology have progressed. Plastic zips are much more flexible which makes wearing front entry suits more comfy as it hugs your body nicely.
Plastic zips should be stored and transported the opposite to brass zips – keep them closed because the teeth will be stronger when they’re knitted together.
MY HONEST OPINION
Now that the issues with plastic zips have been sorted, I totally prefer them over brass. They’re easier to zip up (they slide like a dream) and they’re way easier to look after.
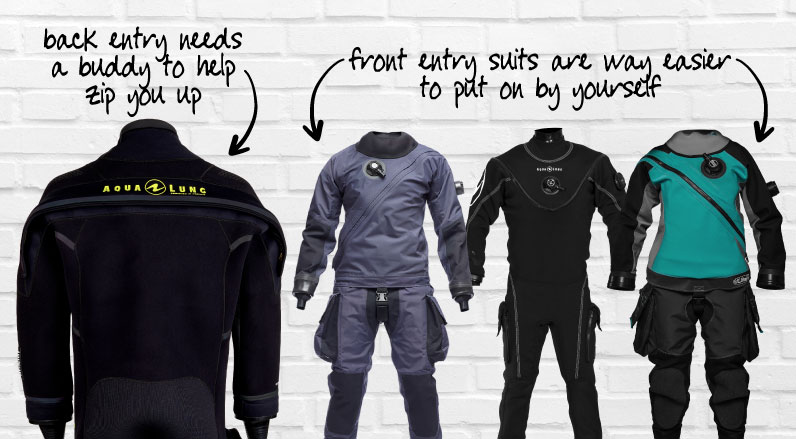
DRYSUIT ENTRY
There’s a couple of different drysuit features to choose from when it comes to getting it on and off. You can have back entry suits where the zip runs across the back of your shoulders, or a front entry suit where it runs diagonally across your torso (or in some cases in an arc around your chest).
Back entry suits tend to feature on more basic models of drysuit. It does keep the zip out of the way, so you can place inflation valves wherever you like.
The main drawback of a back entry suit is that unless you’re double-jointed and have worked out some Houdini level of contortion to get round it, you will need your buddy to help zip you up.
Front entry suits are in theory, easier to get on and off – especially if you need to get out of it in a hurry (that was me before I installed a p-valve!) They’re designed so that you can close your own zip, although I always recommend getting your buddy to check that last little bit is closed (it can be hard to see it yourself). There’s nowt worse than jumping in thinking it was all the way closed!
Having the zip running across your chest may mean that your inflator valve is in a slightly different position from what you’re used to. It won’t take long to get the hang of it, but depending on your body frame and gear set-up, you might need some different length hoses to reach.
MY HONEST OPINION
These days, back entry suits are really only a feature of budget drysuits (although the Avatar Men’s and Women’s drysuit kicks this trend!) I always recommend front entry suits. You’ll still need to get your buddy to check your zip is all the way closed, but when it comes to a quick exit for a toilet break, at least you can let yourself out of your suit!
TELESCOPIC DRYSUITS
Having a telescopic torso is a drysuit feature you’re most likely to find on trilam suits. The idea behind it is that it gives you a bit extra length to duck your head inside so you can get through the neck. Let’s face it, doing an Ace Ventura through that neck seal is hard enough without being squished in with no room to move.
Once your head is through, you pull down the suit, tucking the extra material away and securing it with a crotch strap.
Telescopic suits also give a little bit more leeway when sizing up for an off-the-peg suit – you might just find that extra length in the torso avoids needing a more expensive custom-fit suit!
MY HONEST OPINION
If you get the option, get a telescopic suit. It makes putting it on easier, and if you’re not getting a custom-made drysuit, this gives you a little bit more flexibility on sizes.
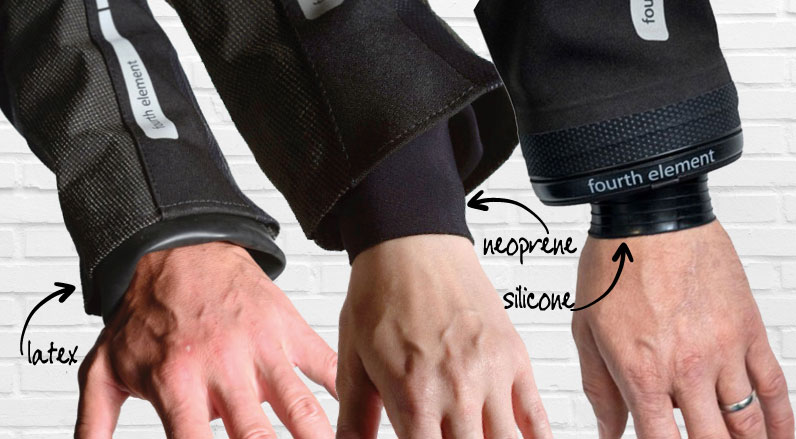
DRYSUIT SEALS
You’ve got three different options when it comes to choosing your seals: neoprene, latex and silicone. They all have pros and cons associated with them. You’ll need to decide which one is the best fit for you.
NEOPRENE SEALS
Neoprene seals provide warmth, we all know how this material keeps us toasty warm underwater. They can be comfier than latex and easier to don (once you get the hang of the folding/tucking-in method on your neck seal) and they definitely don’t pull your hair out as much. They’re also longer lasting although they can be prone to leaking especially when you flex your wrists or look up.
LATEX SEALS
The main issue I have with latex seals is that nasty rash it gives you when you’re diving a lot – especially in salt water. It’s painful and looks ridiculous, leading to some weird questions from your non-diving buddies as it kinda looks like you’ve been strangling yourself! There are some balms you can rub on your neck before the dive to prevent this and you can also get a neck guard made of silicone to create a barrier.
If you can keep on top of the regular balm application, I do think latex provides the best seal. There’s more options when it comes to sizing and trimming to get the perfect fit. One downside compared to neoprene is that there’s no thermal protection from the seals, but you should be able to overcome this with some decent hoods and gloves.
Latex seals are also more prone to tearing as they can degrade when exposed to certain chemicals or direct sun and heat. Like neoprene, when your latex seals go, you’ll have to take them to your local dive centre to be replaced.
SILICONE SEALS
I really like silicone seals. I think they’re the comfiest and it’s unlikely that they’ll cause any kind of irritation to your skin.
One drawback is that they are much easier to tear than the other types of seals. However, the good news is that you can replace them yourself! Just keep some spares in your dive bag and you can switch them out in minutes. You’ll never be sat sulking on dryland because your drysuit seals are broken!
These quick fit systems are ace – you can actually use latex seals for extra durability, and you can now buy modified neoprene neck seals to fit too!
MY HONEST OPINION
I absolutely love the quick fit wrist systems (more on these in a minute). If you want silicone seals (perhaps because you’ve got allergies or sensitive skin) then you’re going to have to get one of these systems installed anyway.
I’m really torn between latex and silicone as my favourite!
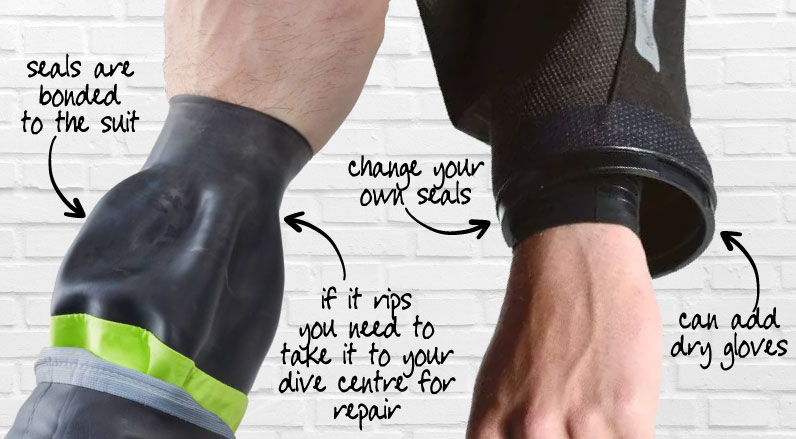
DRYSUIT WRIST SYSTEMS
Now that I’ve mentioned them, let’s have a look at these quick fit systems. Standard latex and neoprene wrist (and neck) seals are bonded to your drysuit. That means if you tear them, you need to take your suit to your dive centre to get new ones glued in. Your suit will be out of action for a while.
A quick fit systems allow you to replace them yourself – and really easily too! Seals normally fail while you’re gearing up for a dive. When a standard seal goes, that’s your dive day scuppered unless you’ve brought a spare suit. Quick fit systems have saved my diving day many times. I can swap out seals by the water’s edge while I’m still fully geared up – it’s a really cool drysuit feature to add.
The other added benefit is that if you’ve got a quick fit wrist system installed on your suit, you can also use drygloves (more on these in a minute).
There’s quite a few quick fit systems on the market, and the most popular include:
SITECH
Sitech manufacture the Quick Cuff and the Slaggo. Quick Cuff has been around for a while and most drygloves are designed to fit this system. Slaggo features a more flexible ring, but you’ll be limited in dryglove options. To be honest, flexibility doesn’t really matter – both are really comfy.
KUBI
Kubi is probably one of the most talked about and well rated quick fit systems. It does have a great dryglove attachment but due to the outer diameter of the system, it can be difficult to retrofit to certain suits (especially neoprene or ladies cuts). If you fancy the Kubi system, it’s best to get it fitted when your suit is getting made.
SANTI
Santi have developed their own take on the quick fit system with Santi Smart Seals. They’ll come as standard on Santi and Avatar drysuits. They’re simple and effective plus you can use both latex and silicone in the system.
MY HONEST OPINION
Get a quick fit system installed! There is nothing worse than a seal ripping as you’re gearing up for a day of diving. A lot of suits come with these systems as a standard drysuit feature, but you can retro fit them too. Give me a shout if you’re thinking about upgrading – I might be able to install them for you!
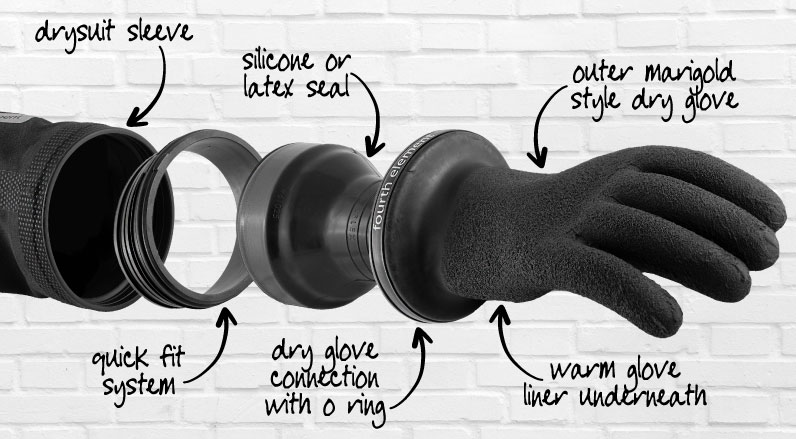
DRY GLOVES
If you’ve got a quick fit wrist and you suffer from cold hands on your dives, you might as well go the full hog and get some dry gloves too. Believe it or not, I actually find that my dry gloves give me better dexterity compared to traditional wetsuit gloves. It might look like I’ve got sausage fingers on the surface, but as soon as I get underwater and compression takes over, they are brilliant.
There’s loads of options available and in principle, this drysuit feature will keep your hands completely dry. You’ll wear a marigold type glove which won’t give you any thermal insulation, so you’ll need some base layer gloves underneath. I can highly recommend the Fourth Element G1 liners because if you do get a leak, they keep you so warm.
My favourite dry glove systems (in no particular order) are Santi Smart Seals, Fourth Element Eclipse, Kubi and Waterproof Ultima. Which you choose will most likely come down to how they assemble so get down to your local dive shop (or Honest HQ) to have a play.
MY HONEST OPINION
If you get cold hands, dry gloves are a no-brainer – get them added to your suit! They’ll probably take you a few dives to get used to, but keeping your hands toasty and dry is well worth the perseverance. If you’re an absolute freak (like Nic) who’s hands are warmer after the dive than before, you probably won’t need them!
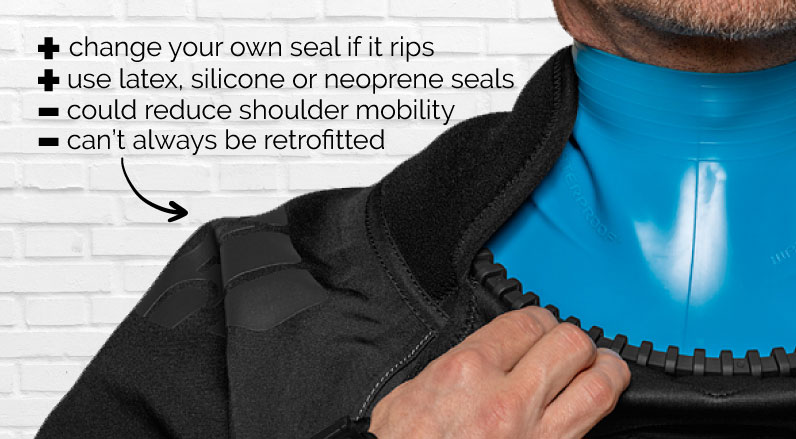
DRYSUIT NECK SYSTEMS
You can also install quick fit for your neck seals. You have the option of latex, silicone and neoprene seals that you can easily swap out if you get a tear (although compared to the wrist systems, it takes a bit of practice).
Sitech is the main manufacturer of this system with their first-generation Quick Neck and newer Orust.
Of the two, I’d say the Quick Neck seals are easier to replace. However, the ring is much more rigid which, as I’ll explain in a minute, can lead to reduced movement and flexibility.
The Orust is a lot softer so doesn’t cause the same mobility issues. I do find it more fiddly to swap out the neck seal as there’s lots of little clips. It gets tricky if I’ve got cold hands or I’m swaying around on a dive boat!
My big caveat with these neck systems is that they do decrease your shoulder mobility. This can prove to be an issue for twinset divers who need to do shutdowns. I’ve found that divers with narrow shoulders suffer the most, which unfortunately includes most ladies.
On some of the women’s cut drysuits, there’s simply not enough material between the seams to fit the system. If there is, there’s a very good chance that the ring is going to sit right underneath your BC should straps or harness making it uncomfortable. This problem is exacerbated if your drysuit features a front entry zip.
MY HONEST OPINION
These quick fit neck systems have all the same benefits as the wrists in terms of convenience and saving dives if your seal tears, but you need to make sure that it’s going to work for you because it’s not for everyone.
If in doubt, call into your local dive centre or visit Honest HQ. You can try the system on for size and see what you think.
DRYSUIT POCKETS
Having pockets gives you extra options for storing important gear like SMBs, reels, spare masks, wetnotes etc. – all the stuff that you’ll have no choice but to clip to your BCD if you’ve got nowhere to stash them.
With most custom suits, you can choose where you put your pockets. If you’re a sidemount diver, this is actually a pretty key decision because if you put them in the “normal” place, you might not be able to access them as your tanks sit in the way.
MY HONEST OPINION
Don’t dive like a Christmas tree covered in gadgets and gizmos. Get them out of the way and streamline yourself. It’s better for your trim and propulsion in the water, and it’s better for the environment so you don’t accidentally snag on anything.
Make sure that you consider the number and placement of pockets during the design process for your new suit. If you don’t have enough on your current suit, or there’s no option to customise an off-the-peg drysuit, they’re really easy to retrofit – just give me a shout!
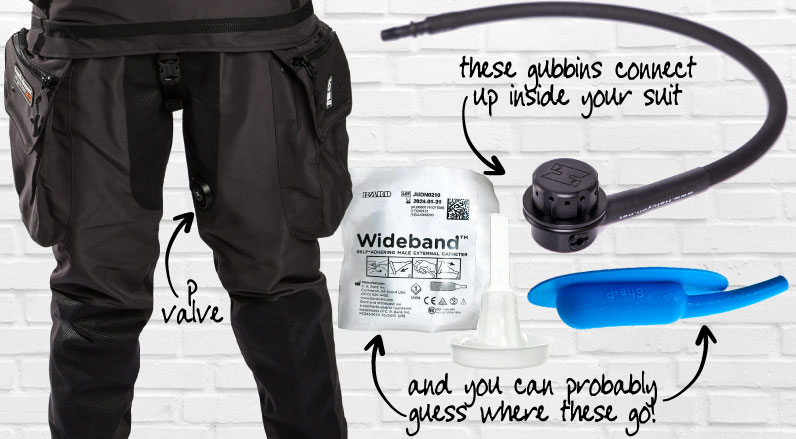
DRYSUIT P-VALVES
I’ve saved the best till last. My P-valve has revolutionised my diving! Long gone are the days when I’m racing out of the water to get to the bog, no more praying to the urine fairies to just hold it a little bit longer while I get my suit down. P-valves are a great drysuit feature to add if you want to stay hydrated (super important for diving) and not worry about getting caught short.
However. P-valves do take a bit of getting used to – especially for the ladies, but I’ll let Nic write a blog post about that one!
Another option, only for the gents unfortunately, would be to install a convenience zip. You generally only find this drysuit feature on surface suits, but you can get one installed. They’ll make surface intervals a bit easier, but they do add another failure point for leaks.
MY HONEST OPINION
If you’re doing long dives as a tech diver, or you’re spending all day in the water as a dive pro, fitting a P-valve will definitely make life easier. They’re weird to get used to, but after a while, it just becomes another part of your gear set-up.
CONCLUSION
So many different drysuit features! It’s crazy! If your head is still spinning and you’re not 100% sure what you need, just reach out. I’d love to go through all the different options with you so we can work out what’s best together. I promise it won’t be a pushy sales call, I won’t even mind if you don’t end up buying from us (we might not have what you need!) I’d much rather make sure that every diver has the perfect gear for them 🙂